[vc_row][vc_column width=”1/1″][vc_column_text]
Another Free Video By Bikers For Bikers!
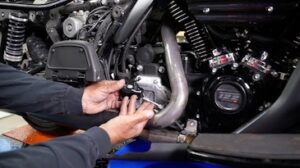
VIDEO& BLOG-In this tutorial video I show you how to adjust your rear air suspension on your Harley Davidson touring model. I am using Lurch's 2008 Harley Davidson Street Glide in this video, but the air suspension shocks have been used on many other Harley Davidson touring models over a long period of time. Additionally, in the video and this blog I provide you with a recommended preload settings chart.[/vc_column_text][/vc_column][/vc_row][vc_row bg_type=”no_bg” parallax_style=”vcpb-default” bg_image_repeat=”repeat” bg_image_size=”cover” bg_img_attach=”scroll” parallax_sense=”30″ animation_direction=”left-animation” animation_repeat=”repeat” bg_override=”0″ parallax_content_sense=”30″ fadeout_start_effect=”30″ overlay_pattern_opacity=”80″ seperator_type=”none_seperator” seperator_position=”top_seperator” seperator_shape_size=”40″ seperator_svg_height=”60″ seperator_shape_background=”#fff” seperator_shape_border=”none” seperator_shape_border_width=”1″ icon_type=”no_icon” icon_size=”32″ icon_style=”none” icon_color_border=”#333333″ icon_border_size=”1″ icon_border_radius=”500″ icon_border_spacing=”50″ img_width=”48″][vc_column width=”1/1″ css=”.vc_custom_1418097360707{background-color: #1e73be !important;}”][vc_cta_button call_text=”Useful For Purchase Videos-Start Saving Your Money!” title=”Check them out!” target=”_blank” color=”btn-primary” icon=”wpb_play” size=”btn-large” position=”cta_align_right” href=”https://www.lawabidingbiker.com/buyvideos”][/vc_column][/vc_row][vc_row bg_type=”no_bg” parallax_style=”vcpb-default” bg_image_repeat=”repeat” bg_image_size=”cover” bg_img_attach=”scroll” parallax_sense=”30″ animation_direction=”left-animation” animation_repeat=”repeat” bg_override=”0″ parallax_content_sense=”30″ fadeout_start_effect=”30″ overlay_pattern_opacity=”80″ seperator_type=”none_seperator” seperator_position=”top_seperator” seperator_shape_size=”40″ seperator_svg_height=”60″ seperator_shape_background=”#fff” seperator_shape_border=”none” seperator_shape_border_width=”1″ icon_type=”no_icon” icon_size=”32″ icon_style=”none” icon_color_border=”#333333″ icon_border_size=”1″ icon_border_radius=”500″ icon_border_spacing=”50″ img_width=”48″][vc_column width=”1/1″ css=”.vc_custom_1418092338360{padding: 0px !important;}”][vc_video link=”http://youtu.be/9_6KUvFGMXE” title=”How to adjust Harley Air Suspension Shocks “][/vc_column][/vc_row][vc_row bg_type=”no_bg” parallax_style=”vcpb-default” bg_image_repeat=”repeat” bg_image_size=”cover” bg_img_attach=”scroll” parallax_sense=”30″ animation_direction=”left-animation” animation_repeat=”repeat” bg_override=”0″ parallax_content_sense=”30″ fadeout_start_effect=”30″ overlay_pattern_opacity=”80″ seperator_type=”none_seperator” seperator_position=”top_seperator” seperator_shape_size=”40″ seperator_svg_height=”60″ seperator_shape_background=”#fff” seperator_shape_border=”none” seperator_shape_border_width=”1″ icon_type=”no_icon” icon_size=”32″ icon_style=”none” icon_color_border=”#333333″ icon_border_size=”1″ icon_border_radius=”500″ icon_border_spacing=”50″ img_width=”48″][vc_column width=”1/1″ css=”.vc_custom_1418097714620{background-color: #1e73be !important;}”][vc_cta_button call_text=”Other Useful Free Videos-Work on Your Own Motorcycle!” title=”Check them out!” target=”_blank” color=”btn-primary” icon=”wpb_play” size=”btn-large” position=”cta_align_right” href=”https://www.lawabidingbiker.com/freevideos”][/vc_column][/vc_row][vc_row bg_type=”no_bg” parallax_style=”vcpb-default” bg_image_repeat=”repeat” bg_image_size=”cover” bg_img_attach=”scroll” parallax_sense=”30″ animation_direction=”left-animation” animation_repeat=”repeat” bg_override=”0″ parallax_content_sense=”30″ fadeout_start_effect=”30″ overlay_pattern_opacity=”80″ seperator_type=”none_seperator” seperator_position=”top_seperator” seperator_shape_size=”40″ seperator_svg_height=”60″ seperator_shape_background=”#ffffff” seperator_shape_border=”none” seperator_shape_border_width=”1″ icon_type=”no_icon” icon_size=”32″ icon_style=”none” icon_color_border=”#333333″ icon_border_size=”1″ icon_border_radius=”500″ icon_border_spacing=”50″ img_width=”48″ ult_hide_row_large_screen=”off” ult_hide_row_desktop=”off” ult_hide_row_tablet=”off” ult_hide_row_tablet_small=”off” ult_hide_row_mobile=”off” ult_hide_row_mobile_large=”off” bg_grad=”background: -webkit-gradient(linear, left top, left bottom, color-stop(0%, #E3E3E3));background: -moz-linear-gradient(top,#E3E3E3 0%);background: -webkit-linear-gradient(top,#E3E3E3 0%);background: -o-linear-gradient(top,#E3E3E3 0%);background: -ms-linear-gradient(top,#E3E3E3 0%);background: linear-gradient(top,#E3E3E3 0%);”][vc_column width=”1/1″][vc_column_text]I had a 2011 Harley Street Glide prior to purchasing my 2014 Harley Davidson Street Glide Special, which had the adjustable air type rear suspension, so I am very familiar with it. I also have a tutorial video and blog on the adjustment knob on my 2014 Street Glide Special suspension.
VIDEO-Manual Adjust Harley Davidson Street Glide Touring Rear Suspension
You will need a small portable air pump to adjust the shocks/suspension on your Harley Davidson touring motorcycle. Harley does make a small portable air pump that has some benefits. There are other companies that make an air pump too.
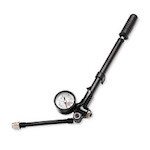 Harley Davidson Touring Suspension Air Pump-54630-03A
NOTES
- Do not exceed max GVWR or GAWR
- ON FLHX MODELS: Always clear the line by adding 3-5 psi (21-35 kPa) before releasing air from the pump's valve, but do not exceed 50 psi (345 kPa).
- ON ALL BUT FLHX MODELS: Always clear the line by adding 3-5 psi (21-35 kPa) before releasing air from the pump's valve, but do not exceed 35 psi (241 kPa).
Here is an alternative that works just the same and is cheaper on Amazon:
Bagger Werx 07-012 Motorcycle Air Shock Hand Pump

CAUTION
Never use an air compressor to adjust your Harley Davidson suspension/shocks. Doing so can ruin your suspension system and is too powerful.
Low profile rear suspension recommended air pressures: FLHX (STREET GLIDE)
| Shock Load | Total Weight | Pressure |
|---|---|---|
| Solo Rider | up to 160 lbs (0-73 kg) | 0-5 psi (0-35 kPa) |
| Solo Rider | 160-200 lbs (73-91 kg) | 0-10 psi (0-69 kPa) |
| Solo Rider | Over 200 lbs (91 kg) | 5-10 psi (35-69 kPa) |
| Rider with passenger weight of | up to 150 lbs (0-68 kg) | 20-30 psi (138-207 kPa) |
| Rider with passenger weight of | over 150 lbs (over 68 kg) | 25-35 psi (172-241 kPa) |
| Maximum GVWR | See Label | 40-50 psi (276-345 kPa) |
[/vc_column_text][/vc_column][/vc_row][vc_row][vc_column width=”1/1″][vc_column_text] If you appreciate free information and techniques like this make sure to join the thousands of law abiding bikers that have already joined the free Law Abiding Biker Podcast & Media Email Club!! You will be notified of new useful motorcycle content and techniques as we put them out. Join the Community now![/vc_column_text][/vc_column][/vc_row]