 If you ride a Harley-Davidson touring model you know just how valuable your saddlebags and paint are. One accidental drop or even a slight tip can cost you big bucks in repairs or repainting. That’s exactly why I install saddlebag tip-over guards on all my Harleys—and in this article (and the accompanying video below), I’m showing you how I installed the new Harley OEM tip over guards on my 2024 Street Glide.
Why Install Saddlebag Tip-Over Guards?
These aren’t just for looks—though they do add a badass King of the Baggers-inspired vibe. Tip-over guards offer real-world protection for your saddlebags, especially during low-speed maneuvers.
Here’s what makes the Harley OEM ST-style guards stand out:
-
Inspired by the Harley ST model look with a tighter, more modern wrap
-
Includes integrated end caps (I call them “skateboard wheels”) for additional sliding protection
-
Keeps your bags off the pavement in a tip, preventing damage to expensive bodywork and paint
-
Adds a performance-style look with functional benefits
Let’s be honest—if you ride often, you're either going to drop your bike at some point. These guards offer peace of mind and look great doing it.

SUPPORT US AND SHOP IN THE OFFICIAL LAW ABIDING BIKER STORE
What Makes These ST-Style Guards Different?
Unlike the traditional wraparound saddlebag guards found on earlier touring Harleys, the ST-style bars are tighter, sleeker, and more 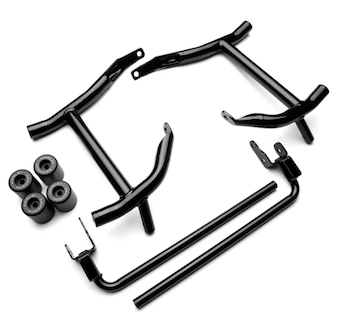 performance-oriented. Originally seen on the 2024 Road Glide ST and Street Glide ST, these guards have now become a popular aftermarket upgrade for all touring models, including standard Street Glides and Road Glides.
They're minimalist, functional, and have that King of the Baggers racing aesthetic—while still doing their job: protecting your bike.
Tools & Items Used or Mentioned in the Video
Many items mentioned in the tutorial video are available right in the Law Abiding Biker™ Store:
-
Harley OEM ST-Style Saddlebag Tip-Over Guards
-
Ricrak Saddlebag Safety Bolts – Replaces stock saddlebag bolts for safer, quicker access
-
Rickrak Extended Seat Bolt – Makes removing your seat tool-free and simple
-
Saddlemen Road Sofa Heated Seat – A premium touring seat shown in the video
-
Basic Hand Tools – Torx bits, sockets, and torque wrench
-
Blue Threadlocker – To keep bolts secure
CHECK OUT OUR HUNDREDS OF FREE HELPFUL VIDEOS ON OUR YOUTUBE CHANNEL AND SUBSCRIBE!
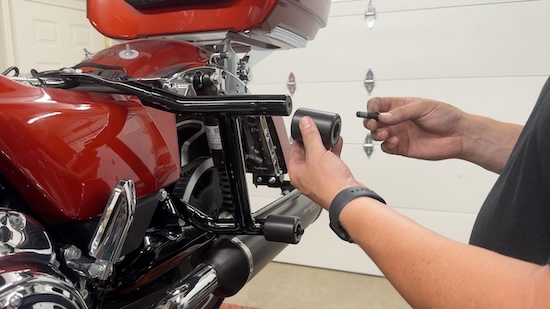
Saddlebag Guard Install: Broad Overview
The install process is straightforward and can be done in a garage with basic tools and mechanical know-how. Here’s a broad overview of the steps we cover in the video:
-
Remove the Seat & Saddlebags
Start by removing your seat using an extended seat bolt, then take off your saddlebags. We use Rick Rack bolts for easy removal. -
Remove Stock Saddlebag Support Bars
Unbolt the existing saddlebag support brackets and exhaust mounting points using the appropriate Torx and socket tools. -
Transfer Components
Transfer the rubber mounting block and exhaust bracket from the stock support to the new ST-style guard. -
Install the New Tip-Over Guards
Align the new guards and loosely install them using the provided hardware. Reuse your stock bolts where applicable and hand-tighten everything for proper fitment. -
Torque to Spec
Using a torque wrench, snug everything down to the manufacturer’s recommended torque specs for a safe and secure install. -
Install the End Caps (Skateboard Wheels)
These bolt into the end of the guards and are torqued to spec. They help prevent wear on the bars during a tip. -
Reassemble Your Bike
Reinstall your saddlebags and seat—and you’re good to go! The other side installs exactly the same way.
 LISTEN TO THE LAW ABIDING BIKER PODCAST!
Final Thoughts: A Simple Mod That Can Save You Big
If you ride a Harley-Davidson touring model, installing saddlebag tip-over guards is one of the smartest, most functional mods you can make. Not only do these ST-style guards add a sleek, aggressive look, but they also provide real protection that can save you hundreds (if not thousands) in potential damage.
👉 Watch the full install video below to get the exact steps, torque specs, and get pro tips.
Join the Free Email Club!
If you appreciate this free information make sure to join the thousands of law abiding bikers that have already joined the free Email Club! You will be notified of new useful motorcycle content and techniques as we put them out. Join the Community now!


Leave a Reply