 For over 20 years, the basic Harley-Davidson cable clutch system has remained largely unchanged. While it’s reliable, let’s be honest—it doesn’t exactly feel premium. If you’ve ever ridden a motorcycle with a hydraulic clutch-which Harley had on touring bikes from 2014-2020, you know the difference immediately: lighter pull, smoother engagement, and less hand fatigue.
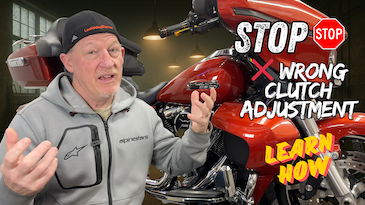
In this guide, we’re going to walk you through how to properly adjust your Harley-Davidson cable clutch system—both externally and internally—and show you proven ways to dramatically improve clutch feel. We’ll give you a clear overview here, then point you to our full step-by-step video at the bottom of the page for exact procedures.
Every product mentioned in this article is available in the Law Abiding Biker Store, and unlike big corporate motorcycle retailers, we actually install, test, and ride with the products we sell. That firsthand experience matters.

SUPPORT US AND SHOP IN THE OFFICIAL LAW ABIDING BIKER STORE
Why Harley-Davidson’s Cable Clutch Feels Outdated
Harley-Davidson—and yes, Indian as well—uses a cable-operated clutch system on many modern bikes. Most other motorcycle manufacturers (including dirt bikes and even electric bikes) have used hydraulic clutches for years because they:
- Require less lever effort
- Provide smoother engagement
- Reduce hand fatigue in traffic or long rides
- No internal adjustments necessary for the lift of the clutch
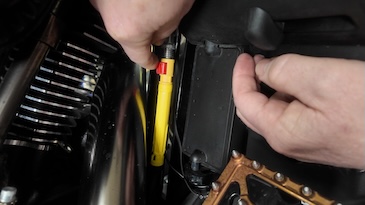
Stock OEM Harley Plastic Inline Cable Adjuster
In 2021, Harley-Davidson moved away from hydraulic clutches on certain models and returned to a cable system that relies on a plastic inline Bowden-style adjuster. While functional, it has several drawbacks:
- Limited ability to fine-tune clutch engagement
- Predetermined tension (not rider-adjustable)
- Plastic construction that can fail and leave you stranded
We know these fail in real-world riding and training environments.
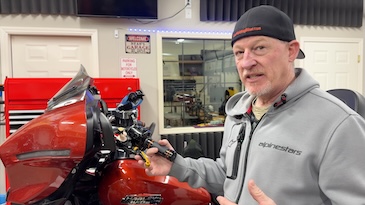
How We Improve the Harley Cable Clutch Feel
As a long time police motorcycle officer and instructor, I’ve used both hydraulic and cable clutch systems in extreme training and duty conditions. When Harley went back to cable clutches, we asked a simple question:
How close can we get a cable clutch to feeling like a hydraulic system?
The answer is a combination of:
- Proper external clutch adjustment
- Correct internal clutch adjustment
- Replacing weak factory components with proven aftermarket solutions
Let’s break it down.
CHECK OUT OUR HUNDREDS OF FREE HELPFUL VIDEOS ON OUR YOUTUBE CHANNEL AND SUBSCRIBE!
External Clutch Adjustment Overview
Your external clutch adjustment is the first line of defense and can be done multiple times before an internal adjustment is required.
Stock Plastic Adjuster (What Harley Uses)
The factory setup uses a yellow plastic inline adjuster with a red release button. When pressed, a spring sets the tension automatically.
Downside:
- You get where the clutch wants to engage, not where you want it.
- No fine adjustment
- Plastic construction can fail
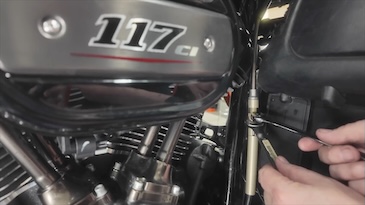 Metal Adjustable Bowden Replacements (Recommended)
We strongly recommend replacing the plastic adjuster with a metal adjustable Bowden-style unit, which gives you back full control.
Two excellent options we sell and use:
These allow you to:
- Precisely set clutch engagement point
- Maintain consistent lever feel
- Lock adjustments securely
👉 All of these are available in the Law Abiding Biker Store, with full install videos embedded directly on the product pages.
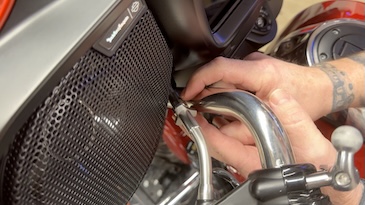
Fat Bagger EZ Install Upper Clutch Cable With Adjuster (at your lever)
Upper Clutch Cable Option: Adjustment at the Lever
For riders who want maximum convenience, the Fat Baggers Upper Clutch Cable moves the adjuster from the right side of the bike up near the clutch lever.
Benefits:
- Adjust clutch while seated on the bike
- Eliminates lower plastic components entirely
- Cleaner, more rider-friendly setup
This is the setup I personally run on my bike.
 LISTEN TO THE LAW ABIDING BIKER PODCAST!
The Ultimate Upgrade: Mueller Power Clutch 2.0
If you want the biggest transformation possible, this is it.
The Mueller Power Clutch 2.0 doesn’t just add adjustability—it replaces the internal clutch ramp, which is where the magic happens.
What It Does:
- Reduces clutch lever pull by up to 45%
- Dramatically improves smoothness
- Feels as close to a hydraulic clutch as a cable system can
Riders consistently describe it as “butter smooth”, and the reviews back it up.
We sell a ton of these for a reason—they work.
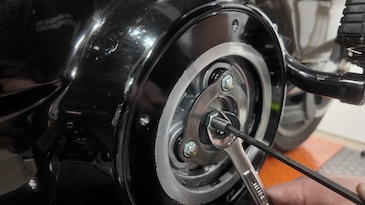 When You Need an Internal Clutch Adjustment
Over time, as clutch plates wear, you’ll notice:
- Excessive free play at the lever
- Engagement happening near the end of the lever pull
- External adjustment range running out
That’s your sign it’s time for an internal clutch adjustment.
We don’t want to overwhelm you here—that’s exactly why we created a full, detailed step-by-step video.
High-Level Internal Adjustment Overview:
- Remove all tension from the clutch cable
- Remove the clutch inspection (derby) cover
- Loosen the lock nut and adjuster screw
- Seat the adjuster, then back it off (¼–½ turn depending on setup)
- Lock the adjustment
- Reinstall the derby cover (proper torque is critical)
- Re-adjust cable externally and fine-tune
⚠️ Pro Tip: Overtightening derby cover bolts can strip threads. Proper torque matters.
 Dialing It All In with PSR Adjustable Levers
To truly fine-tune clutch engagement, we highly recommend PSR adjustable levers, which we also sell and personally run.
PSR Lever Options in the Law Abiding Biker Store:
- Anthem Pro (maximum adjustability)
- Anthem
- Journey
The Anthem Pro allows:
- Micro-adjustments via click-style barrel adjuster
- Adjustable lever length (shorty to full)
- Custom color combinations
How We Set It Up:
- Set the lever adjuster fully out
- Adjust the clutch cable to get close
- Perform internal adjustment if needed
- Finalize engagement using the lever clicks
This gives you maximum flexibility and minimizes how often you need to touch the cable adjustment.

BECOME A PATRON MEMBER AND GET BENEFITS!
Why Buy From the Law Abiding Biker Store?
We’re not a big corporate motorcycle retailer.
We are a bootstrap company of bikers helping bikers, and:
- We install and ride with the products we sell
- We provide real-world advice—not scripted sales talk
- Every product page includes detailed install and review videos
Perks:
- No sales tax outside Washington State
- Free shipping on orders over $100
- Worldwide shipping
Watch the Full Harley-Davidson Clutch Adjustment Video
This article gives you the big picture—but the real value is in the full, detailed video walkthrough.
👇 Scroll down to the bottom of this page to watch our complete clutch adjustment video, where we:
- Show every step clearly
- Explain common mistakes
- Demonstrate real-world setups
If you want your Harley cable clutch to feel smoother, lighter, and more premium—this is your complete guide.
Ride safe and ride often.
Join the Free Email Club!
If you appreciate this free information make sure to join the thousands of law abiding bikers that have already joined the free Email Club! You will be notified of new useful motorcycle content and techniques as we put them out. Join the Community now!

Leave a Reply